---
title: Backup & restore
subtitle: Restore your branch from a point in time or snapshot
summary: >-
Covers the process of using the Backup & Restore feature in Neon to instantly
restore branches to previous states, create and manage snapshots, and schedule
automated backups for data recovery.
tag: new
enableTableOfContents: true
updatedOn: '2026-02-06T22:07:32.923Z'
---
The **Snapshots** feature is now in Beta and available to all users. Snapshot limits: 1 on the Free plan and 10 on paid plans. Automated backup schedules are available on paid plans except for the Agent plan. If you need higher limits, please reach out to [Neon support](/docs/introduction/support).
**Pricing:** Snapshots are provided free of charge during beta, and will be charged based on GB-month storage at a rate lower than standard project storage after GA.
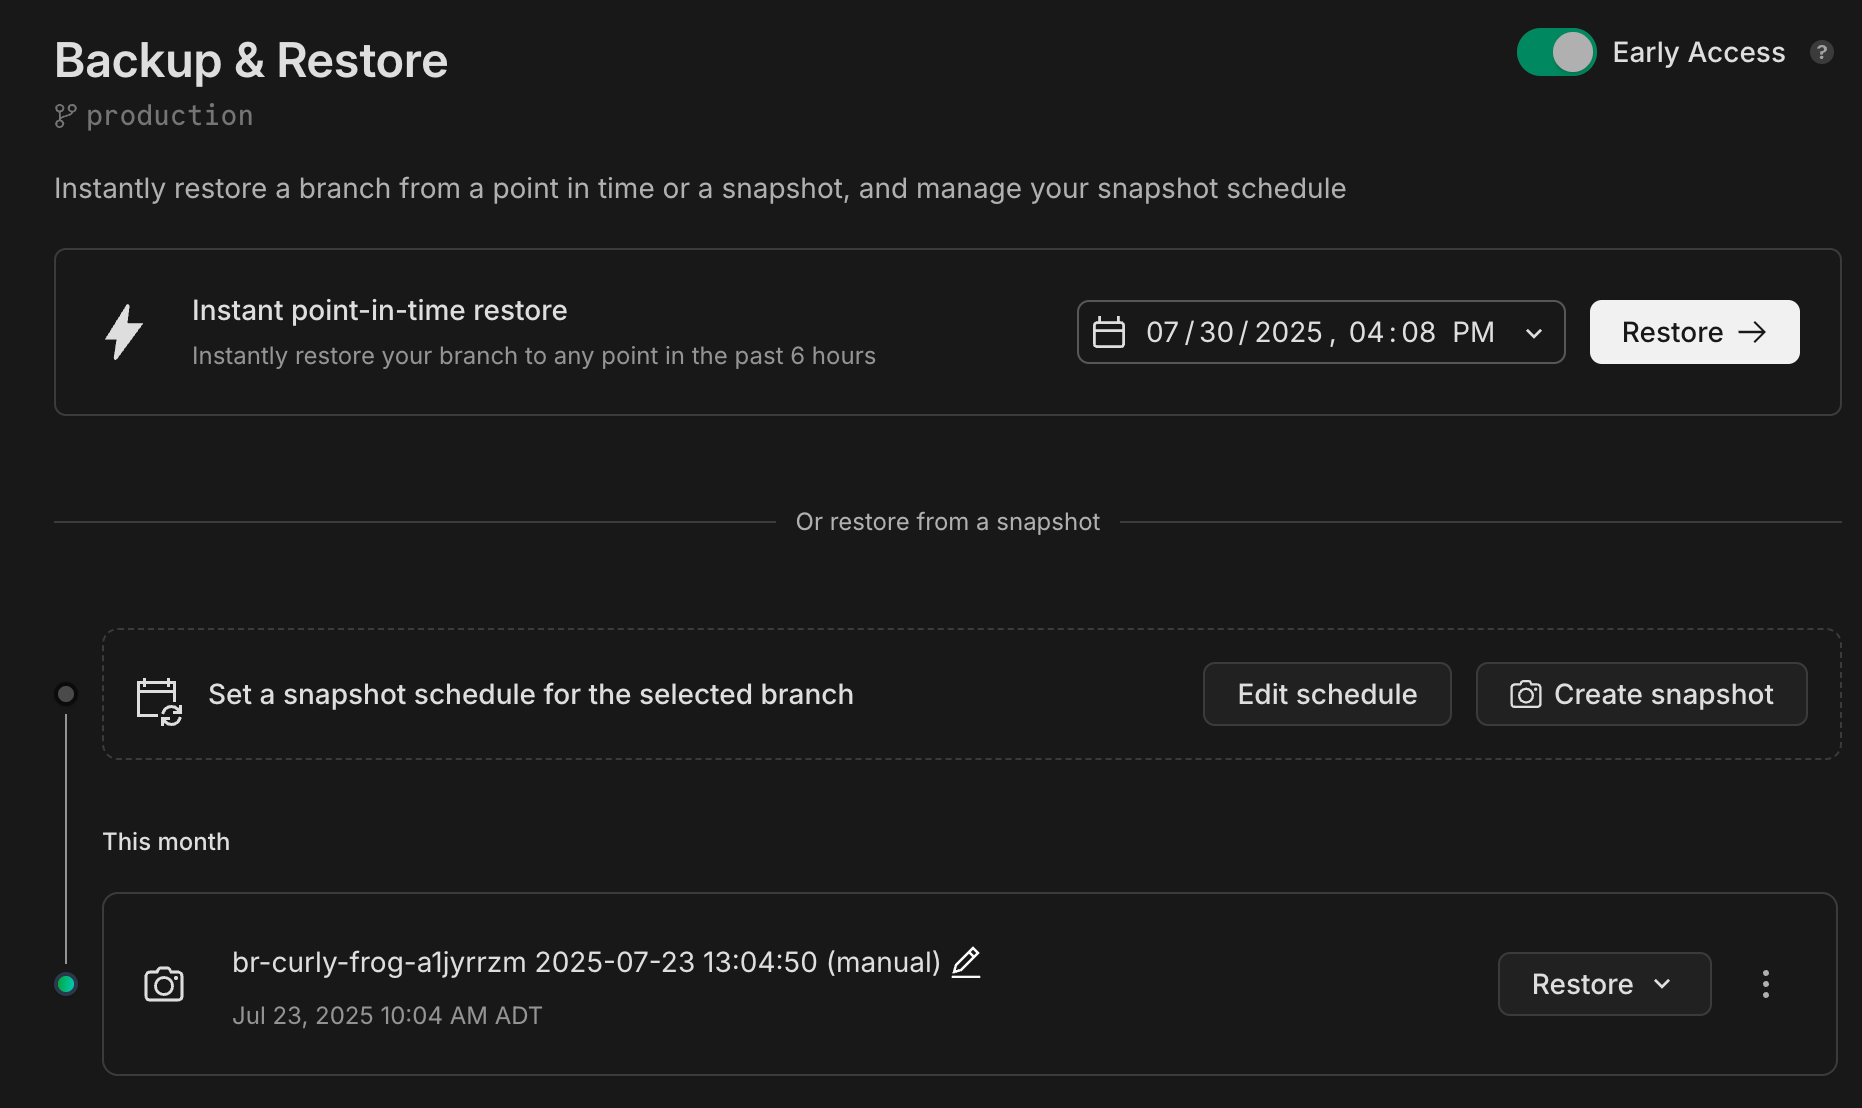
Use the **Backup & restore** page in the Neon Console to instantly restore a branch to a previous state or create and restore snapshots of your data. This feature combines **instant point-in-time restore** and **snapshots** to help you recover from accidental changes, data loss, or schema issues.
The **Enhanced view** toggle in the Neon Console lets you access the Backup & Restore page with snapshot capabilities. When enabled, you can create and manage snapshots alongside instant point-in-time restore. Toggle it off to return to the original Restore page if needed.
---
## What you can do
- ✅ Instantly restore a branch
- ✅ Preview data before restoring
- ✅ Create snapshots manually
- ✅ Schedule automated snapshots
- ✅ Restore from a snapshot
---
## Instantly restore a branch
Instantly restore your branch to a specific time in its history.
> Instant restore is only supported for root branches. Typically, this is your project's `production` branch. [Learn more](/docs/manage/branches#root-branch).
You can restore from any time that falls within your project's [restore window](/docs/introduction/restore-window).
1. **Select a time**
Click the date & time selector, choose a date & time, and click **Restore**.

You'll see a confirmation modal that outlines what will happen:
- Your branch will be restored to its state at the selected date & time
- Your current branch will be saved as a backup, in case you want to revert
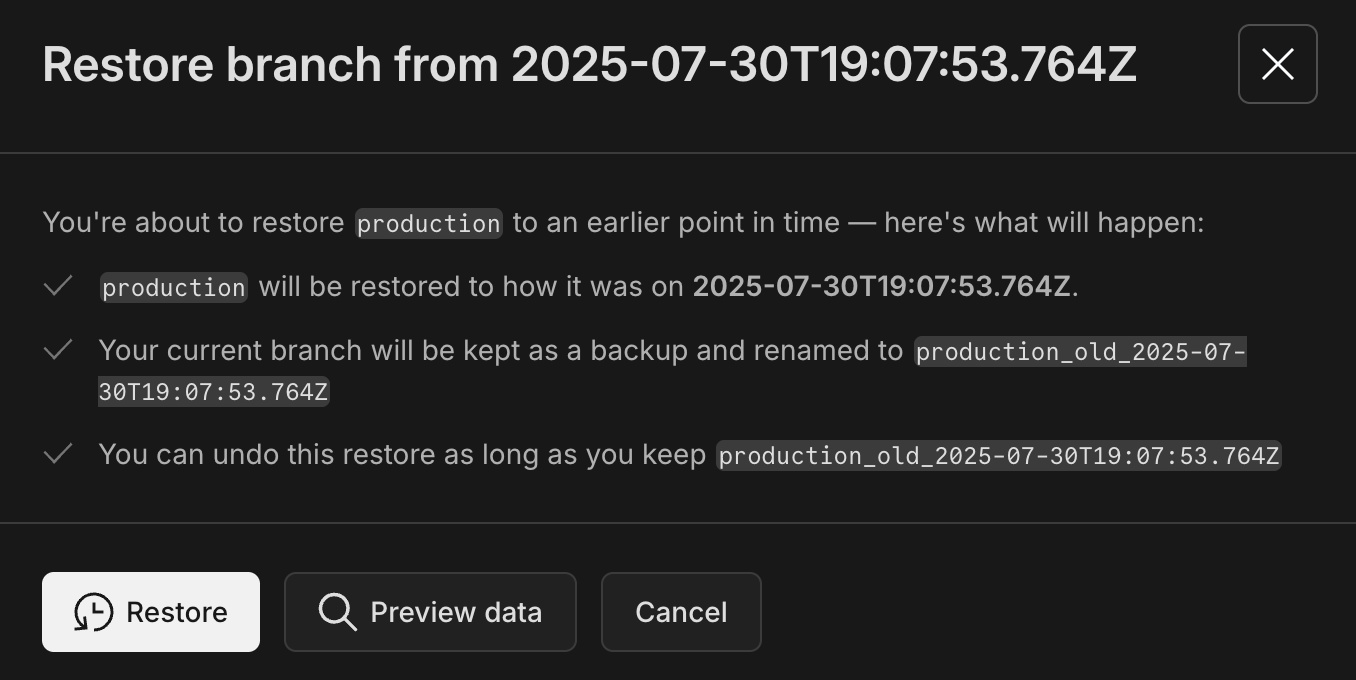
At this point, you can either click **Restore** to proceed or select **Preview data** to inspect the data first.
2. **Preview the data**
To preview the data to make sure you’ve selected the right restore point, you can:
- **Browse data** in the **Tables** view to explore a read-only view of the data at the selected point in time
- **Query data** directly from the restore page to run read-only SQL against the selected restore point
- **Compare schemas** with the schema diff tool to see how your current schema differs from the one at the selected restore point

3. **Restore**
Click **Restore** to complete the restore operation, or **Cancel** to back out. You can also restore directly from any of the **Preview data** pages.
When you restore, a backup branch is automatically created (named `_old_`) in case you need to revert back. You can find this branch on the **Branches** page.

For information about removing backup branches, see [Deleting backup branches](/docs/introduction/branch-restore#deleting-backup-branches).
To restore a branch to an earlier point in time, use the syntax `^self` in the `` field of the `branches restore` command. For example:
```bash shouldWrap
neon branches restore development ^self@2025-01-01T00:00:00Z --preserve-under-name development_old
```
This command resets the target branch `development` to its state at the start of 2025. The command also preserves the original state of the branch in a backup file called `development_old` using the `preserve-under-name` parameter (mandatory when resetting to self).
For full CLI documentation for `branches restore`, see [branches restore](/docs/reference/cli-branches#restore).
To restore a branch using the API, use the endpoint:
```bash
POST /projects/{project_id}/branches/{branch_id_to_restore}/restore
```
This endpoint lets you restore a branch using the following request parameters:
| Parameter | Type | Required | Description |
| ----------------------- | -------- | -------- | ----------------------------------------------------------------------------------------------------------------------------------------------------------------------------------------------------------------------------------------------------------------------------------------------------------------------------------------------------------------------------------------- |
| **source_branch_id** | `string` | Yes | The ID of the branch you want to restore from.
To restore to the latest data (head), omit `source_timestamp` and `source_lsn`.
To restore a branch to its own history (`source_branch_id` equals branch's own Id), you must include: - A time period: `source_timestamp` or `source_lsn` - A backup branch: `preserve_under_name` |
| **source_lsn** | `string` | No | A Log Sequence Number (LSN) on the source branch. The branch will be restored with data up to this LSN. |
| **source_timestamp** | `string` | No | A timestamp indicating the point in time on the source branch to restore from. Use RFC 3339 format for the date-time string. |
| **preserve_under_name** | `string` | No | If specified, a backup is created: the latest version of the branch's state is preserved under a new branch using the specified name.
**Note:** This field is required if: - The branch has children. All child branches will be moved to the newly created branch. - You are restoring a branch to its own history (`source_branch_id` equals the branch's own ID). |
#### Restoring a branch to its own history
In the following example, we are restoring branch `br-twilight-river-31791249` to an earlier point in time, `2024-02-27T00:00:00Z`, with a new backup branch named `backup-before-restore`. Note that the branch id in the `url` matches the value for `source_branch_id`.
```bash shouldWrap
curl --request POST \
--url https://console.neon.tech/api/v2/projects/floral-disk-86322740/branches/br-twilight-river-31791249/restore \
--header 'Accept: application/json' \
--header "Authorization: Bearer $NEON_API_KEY" \
--header 'Content-Type: application/json' \
--data '
{
"source_branch_id": "br-twilight-river-31791249",
"source_timestamp": "2024-02-27T00:00:00Z",
"preserve_under_name": "backup-before-restore"
}
' | jq
```
## Create snapshots manually
Snapshots capture the state of your branch at a point in time. You can create snapshots manually (on root branches only). You can restore to these snapshots from any branch in your project.
To create a snapshot manually, click **Create snapshot**. This captures the current state of your data and saves it as a **Manual snapshot**. It's a good idea to create a snapshot before making significant changes to your schema or data.

You can create a snapshot from a branch using the [Create snapshot](https://api-docs.neon.tech/reference/createsnapshot) endpoint. A snapshot can be created from a specific timestamp (RFC 3339 format) or LSN (e.g. 16/B3733C50) within the branch's [restore window](/docs/introduction/restore-window). The `timestamp` and `lsn` parameters are mutually exclusive — you can use one or the other, not both.
```bash
curl -X POST "https://console.neon.tech/api/v2/projects/project_id/branches/branch_id/snapshot" \
-H "Content-Type: application/json" \
-H 'authorization: Bearer $NEON_API_KEY' \
-d '{
"timestamp": "2025-07-29T21:00:00Z",
"name": "my_snapshot",
"expires_at": "2025-08-05T22:00:00Z"
}' |jq
```
The parameters used in the example above:
- `timestamp`: A point in time to create the snapshot from (RFC 3339 format).
- `name`: A user-defined name for the snapshot.
- `expires_at`: The timestamp when the snapshot will be automatically deleted (RFC 3339 format).
**Related API references:**
- [Create snapshot](https://api-docs.neon.tech/reference/createsnapshot)
- [List project snapshots](https://api-docs.neon.tech/reference/listsnapshots)
- [Update snapshot](https://api-docs.neon.tech/reference/updatesnapshot)
- [Delete snapshot](https://api-docs.neon.tech/reference/deletesnapshot)
## Create backup schedules
Schedule automated snapshots to run at regular intervals — daily, weekly, or monthly — to ensure consistent backups without manual intervention. Backup schedules are configured per branch and only apply to root branches.
To create or modify a backup schedule:
1. **Open the schedule editor**
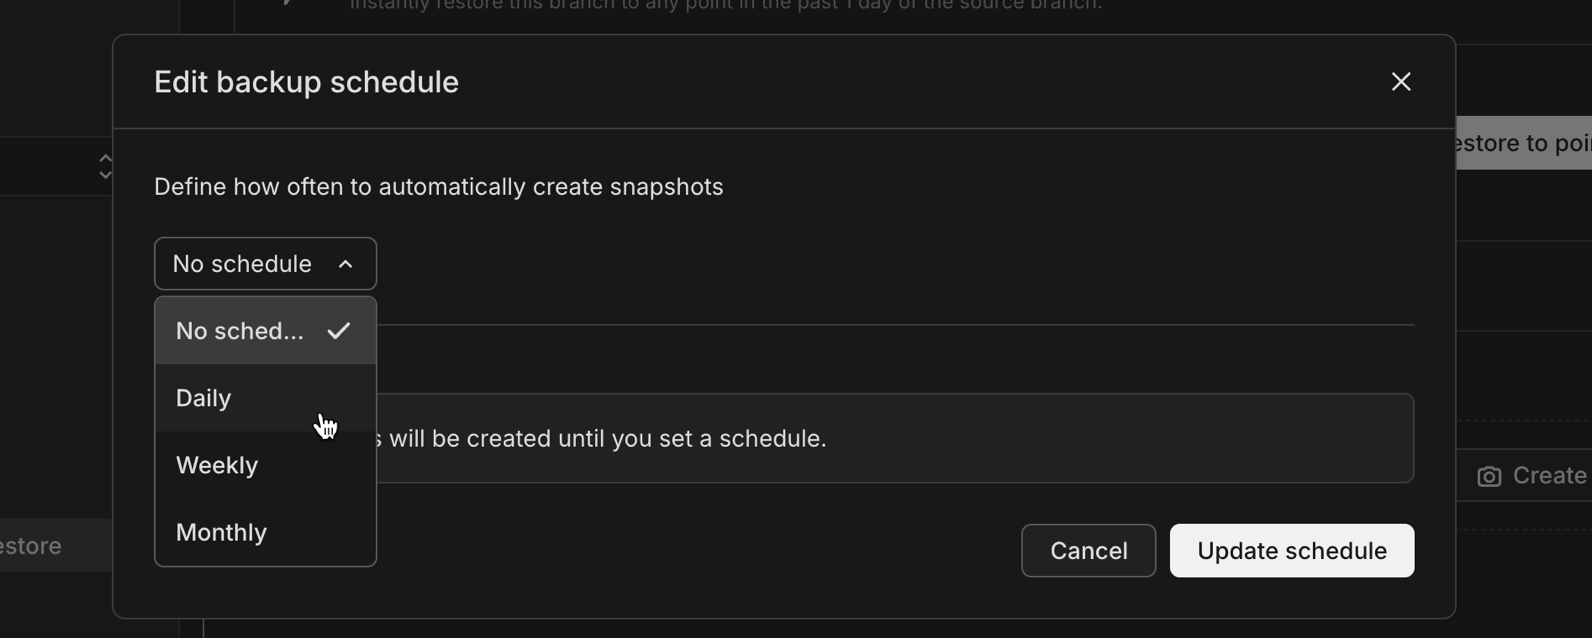
From the **Backup & restore** page, click **Edit schedule** to open the backup schedule configuration dialog.

2. **Select a schedule frequency**
Choose from the following options:
- **No schedule** — Disables automated snapshots (default)
- **Daily** — Creates a snapshot every day at a specified time
- **Weekly** — Creates a snapshot on a specific day of the week
- **Monthly** — Creates a snapshot on a specific day of the month
3. **Configure schedule details**
Depending on your selected frequency, configure how often you want to create snapshots and how long to keep them.
Once configured, snapshots created by the backup schedule will appear on the **Backup & restore** page with a label indicating they were created automatically.
### Snapshot retention
Snapshots are automatically deleted after their retention period expires. You can adjust retention settings at any time by editing the schedule. Note that:
- Shorter retention periods help manage snapshot limits on your plan
- Deleted snapshots cannot be recovered
- Manual snapshots are not affected by backup schedule retention settings
You can view and update backup schedules for branches using the Neon API. For complete API documentation, refer to the [Neon API reference](https://api-docs.neon.tech/reference/getting-started-with-neon-api).
**View backup schedule**
Retrieves the current backup schedule configuration for a branch using the [View backup schedule](https://api-docs.neon.tech/reference/getsnapshotschedule) endpoint.
```bash
GET /projects/{project_id}/branches/{branch_id}/backup_schedule
```
```bash shouldWrap
curl 'https://console.neon.tech/api/v2/projects//branches//backup_schedule' \
-H 'Authorization: Bearer $NEON_API_KEY' | jq
```
**Example response:**
```json
{
"schedule": [
{
"frequency": "daily",
"hour": 23,
"retention_seconds": 1209600
}
]
}
```
**Update backup schedule**
Updates the backup schedule configuration for a branch using the [Update backup schedule](https://api-docs.neon.tech/reference/setsnapshotschedule) endpoint. You can set daily, weekly, or monthly schedules with custom retention periods.
```bash
PUT /projects/{project_id}/branches/{branch_id}/backup_schedule
```
```bash shouldWrap
curl -X PUT 'https://console.neon.tech/api/v2/projects//branches//backup_schedule' \
-H 'Authorization: Bearer $NEON_API_KEY' \
-H 'Content-Type: application/json' \
-d '{
"schedule": [
{
"frequency": "daily",
"hour": 23,
"retention_seconds": 604800
}
]
}' | jq
```
## Restore from a snapshot
You can restore from any snapshot in your project using one of two methods:
- **One-step restore** – Instantly restore data from the snapshot into the existing branch. The branch name and connection string remain the same, but the branch ID changes.
- **Multi-step restore** – Create a new branch from the snapshot. Use this option if you want to inspect or test the data before switching to the new branch.
### One-step restore
Use this option if you want to restore the snapshot data immediately without inspecting the data first.
1. Locate the snapshot you want to use and click **Restore → One-step restore**.
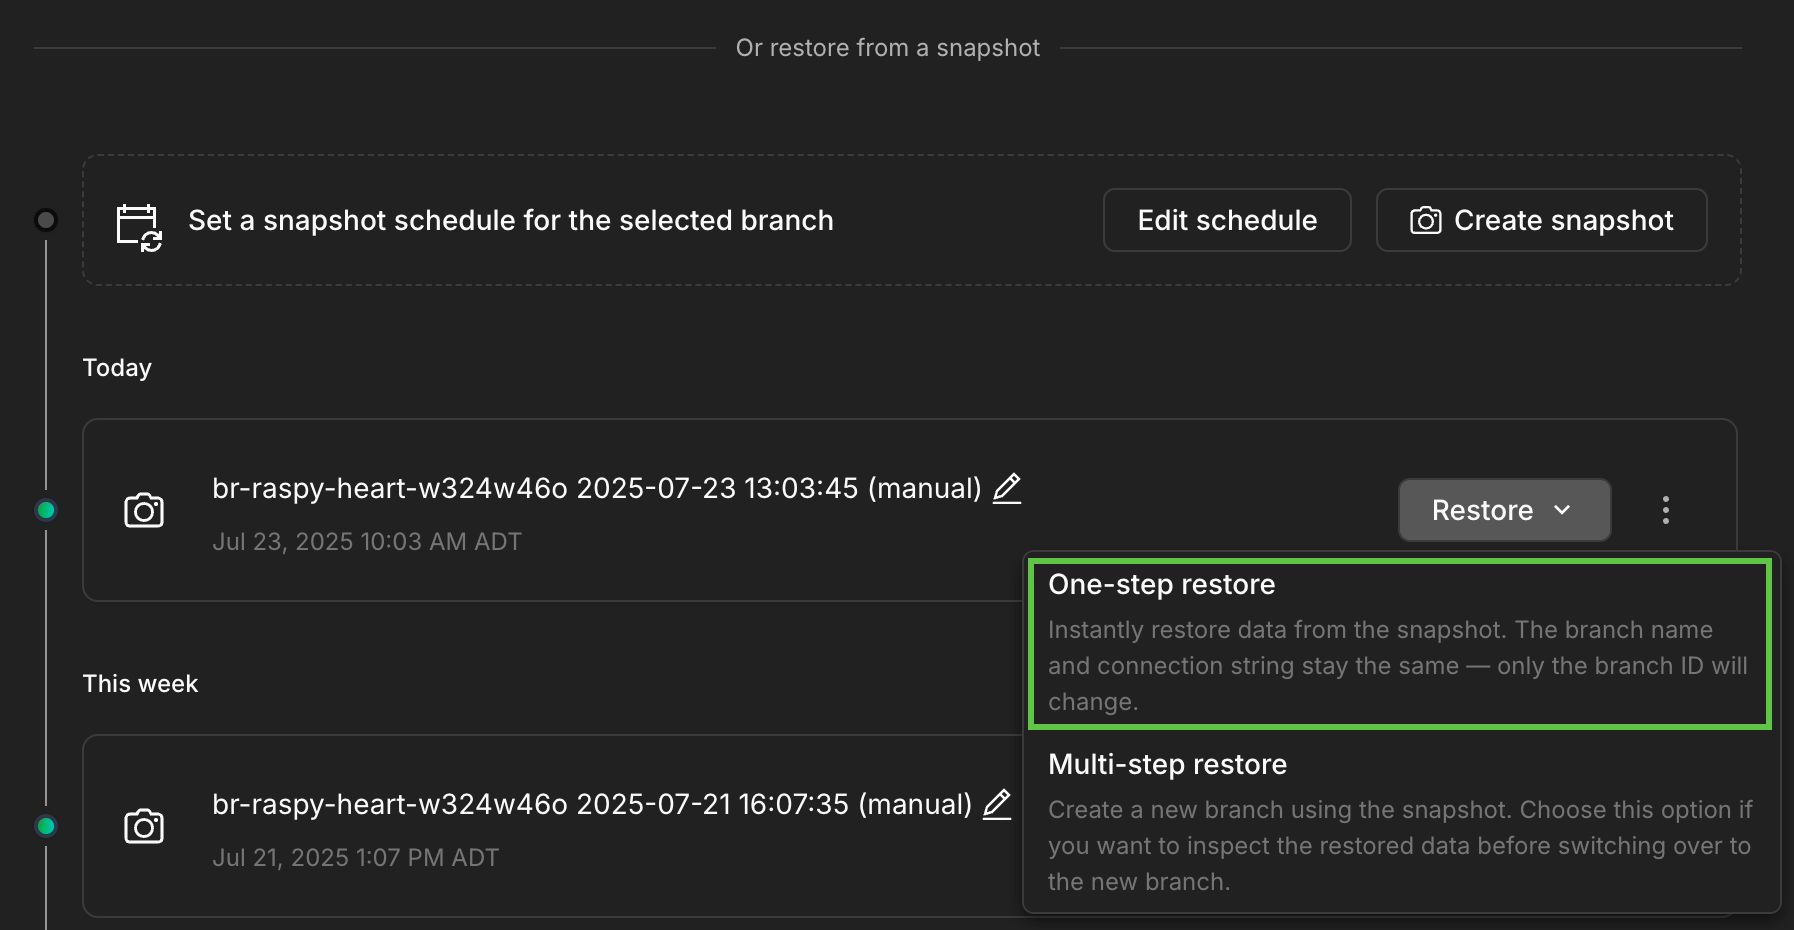
2. The **One-step restore** modal explains the operation:
- The restore operation will occur instantly.
- The current branch will be restored to the snapshot state.
- A branch named `` will be created as a backup. Other snapshots you may have taken previously remain attached to this branch.
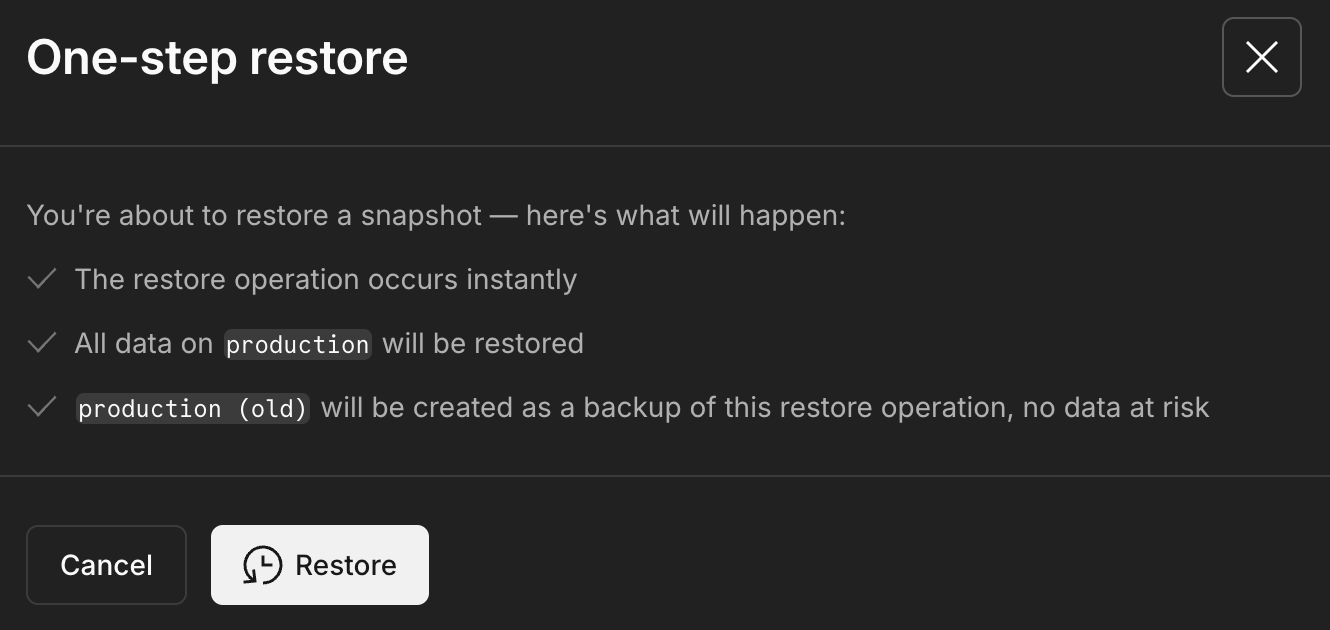
Click **Restore** to proceed with the operation.
3. Your branch is immediately restored to the snapshot state, and the `_old` branch is created, which you'll find on the **Branches** page in the Neon Console, as shown here:
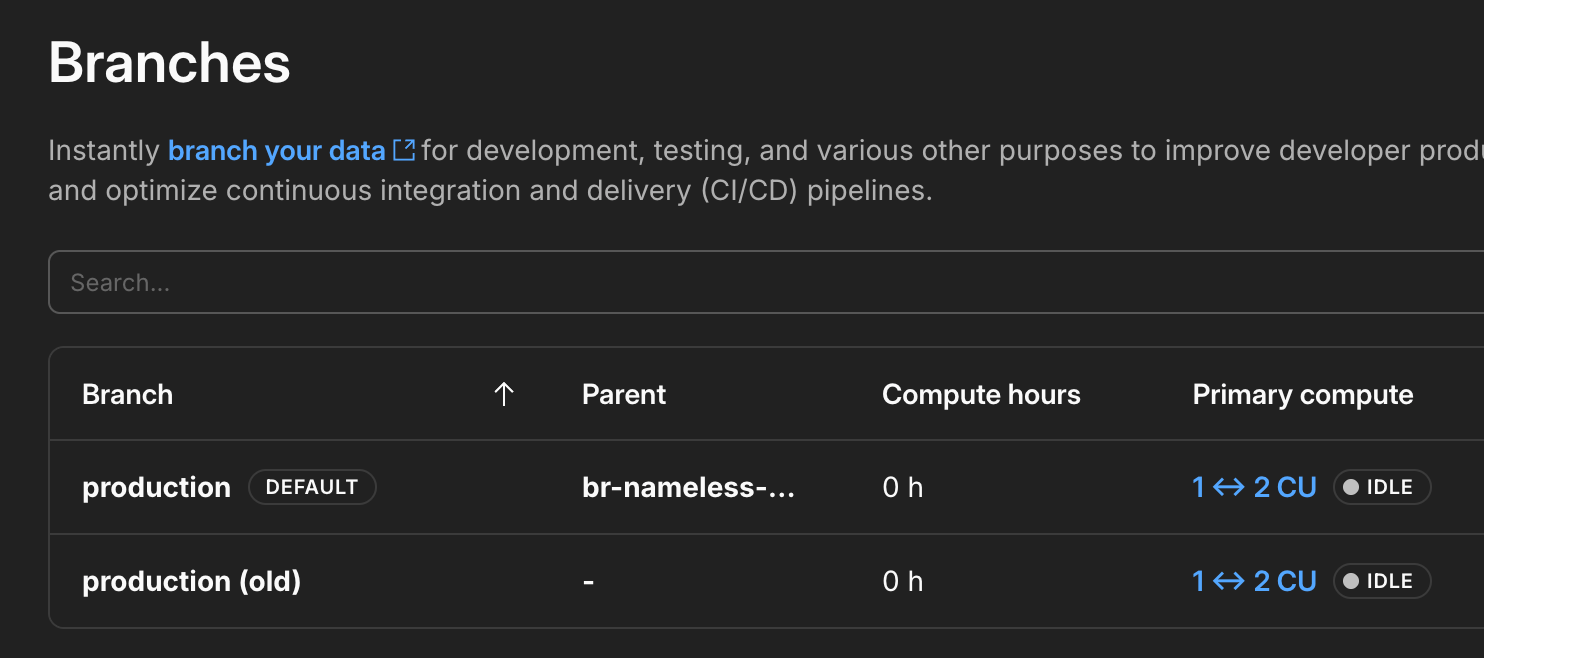
After you verify that the restore operation was successful, you can delete the backup branch if you no longer need it.
A one-step restore operation is performed using the [Restore snapshot](https://api-docs.neon.tech/reference/restoresnapshot) endpoint. This operation creates a new branch, restores the snapshot to the new branch, and moves computes from your current branch to the new branch.
```bash
curl -X POST "https://console.neon.tech/api/v2/projects/project_id/snapshots/snapshot_id/restore?name=restored_branch" \
-H "Content-Type: application/json" \
-H 'authorization: Bearer $NEON_API_KEY' \
-d '{
"name": "restored_branch",
"finalize_restore": false
}' |jq
```
Parameters:
- `name`: (Optional) Name of the new branch with the restored snapshot data. If not provided, a default branch name will be generated.
- `finalize_restore`: Set to `true` to finalize the restore immediately. Finalizing the restore moves computes from your current branch to the new branch with the restored snapshot data for a seamless restore operation — no need to change the connection details in your application.
- `target_branch_id`: (Optional but recommended) The ID of the branch you want to replace when finalizing the restore. If omitted, subsequent snapshot restores may target the branch renamed to ` (old)` from a previous restore, not your intended production branch.
If you plan to apply multiple snapshots in succession, always supply `target_branch_id` to ensure the restore is finalized against the correct branch (typically your current production branch). Without it, a second snapshot may be applied to the previously renamed "(old)" branch.
**Related API references:**
- [Restore snapshot](https://api-docs.neon.tech/reference/restoresnapshot)
- [List project snapshots](https://api-docs.neon.tech/reference/listsnapshots)
### Multi-step restore
Use this option if you need to inspect the restored data before you switch over to the new branch.
1. Locate the snapshot you want to use and click **Restore → Multi-step restore**.
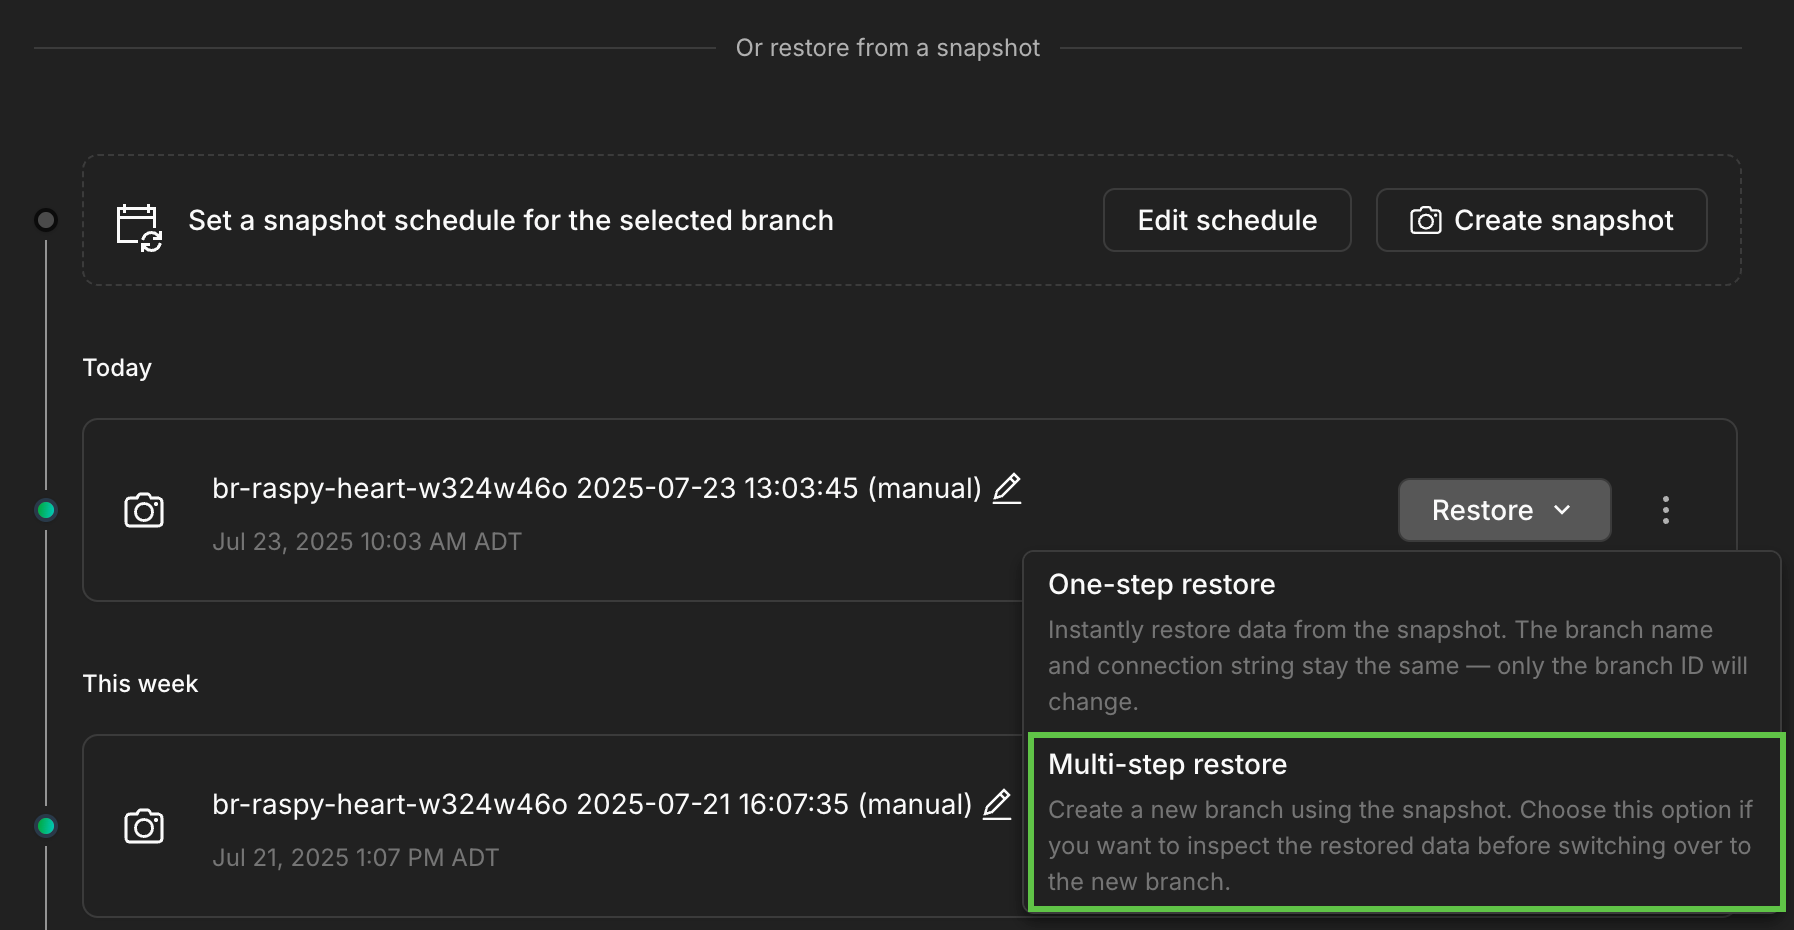
2. The **Multi-step restore** modal explains the operation:
- The restore will occur instantly
- Your current branch will remain unchanged
- A new branch with the snapshot data will be created
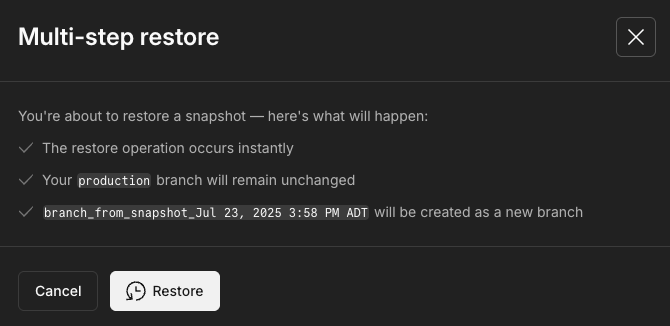
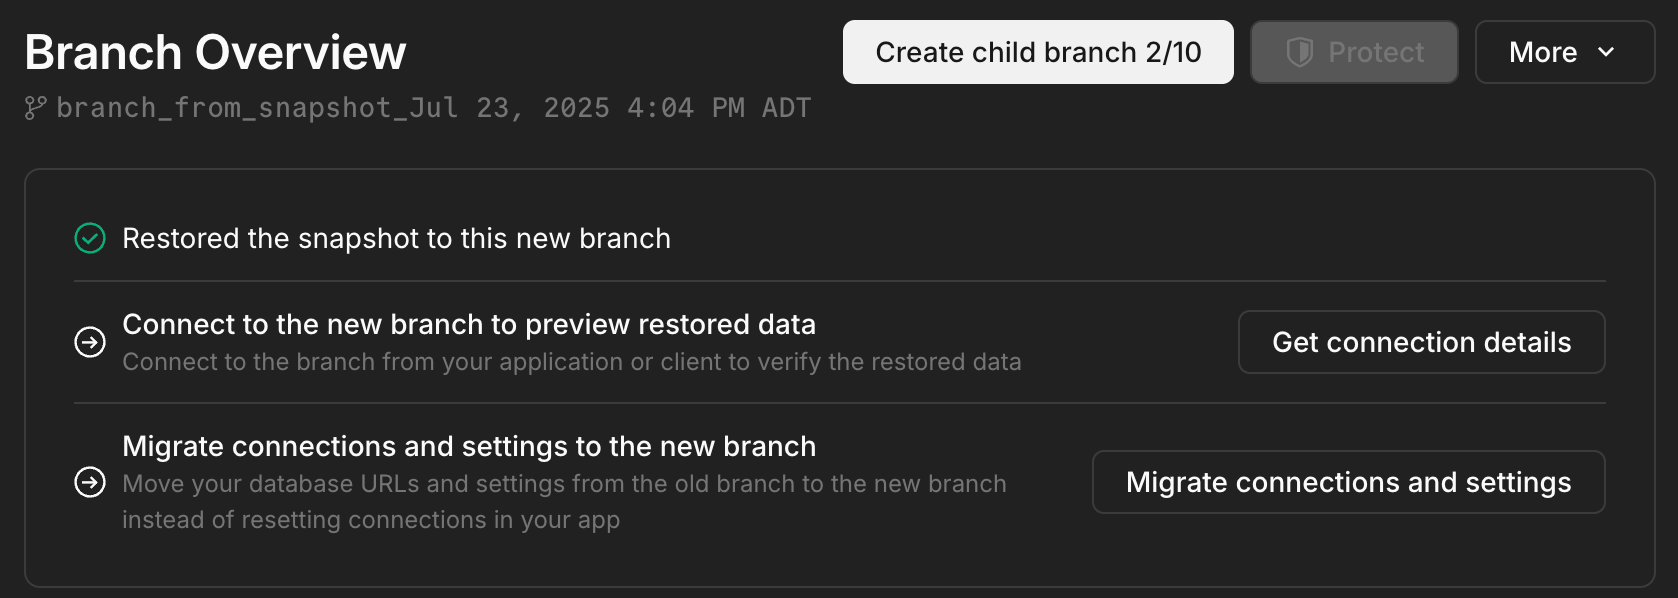
3. Clicking **Restore** creates the new branch with the restored data and directs you to the **Branch overview** page where you can:
- **Get connection details** for the new branch to preview the data restored from the snapshot
- **Migrate connections and settings** to move your database URLs and compute settings from the old branch to the new branch so you don't have to update the connection configuration in your application
1. **Restore the snapshot to a new branch**
The first step in a multi-step restore operation is to restore the snapshot to a new branch using the [Restore snapshot](https://api-docs.neon.tech/reference/restoresnapshot) endpoint:
```bash
curl -X POST "https://console.neon.tech/api/v2/projects/project_id/snapshots/snapshot_id/restore" \
-H "Content-Type: application/json" \
-H 'authorization: Bearer $NEON_API_KEY' \
-d '{
"name": "my_restored_branch",
"finalize_restore": false
}' |jq
```
Parameters:
- `name`: (Optional) Name of the new branch with the restored snapshot data. If not provided, a default branch name will be generated.
- `finalize_restore`: Set to `false` so that you can inspect the new branch before finalizing the restore operation.
- `target_branch_id`: (Optional but recommended) Specify the branch ID you intend to replace when you later finalize the restore (typically your production branch). Providing this avoids subsequent operations defaulting to the ` (old)` branch created by an earlier restore.
You can find the `snapshot_id` using the [List project snapshots](https://api-docs.neon.tech/reference/listsnapshots) endpoint.
```bash
curl -X GET "https://console.neon.tech/api/v2/projects/project_id/snapshots" \
-H "Content-Type: application/json" \
-H "Authorization: Bearer $NEON_API_KEY" |jq
```
If you will finalize the restore later or plan multiple restores, include `target_branch_id` during the restore call to anchor the operation to the correct target branch.
2. **Inspect the new branch**
After restoring the snapshot, you can connect to the new branch and run queries to inspect the data. You can get the branch connection string from the Neon Console or using the [Retrieve connection URI](https://api-docs.neon.tech/reference/getconnectionuri) endpoint.
```bash
curl --request GET \
--url 'https://console.neon.tech/api/v2/projects/project_id/connection_uri?branch_id=branch_id&database_name=db_name&role_name=role_name&pooled=true' \
--header 'accept: application/json' \
--header 'authorization: Bearer $NEON_API_KEY' |jq
```
3. **Finalize the restore**
If you're satisfied with the data on the new branch, finalize the restore operation using the [Finalize restore](https://api-docs.neon.tech/reference/finalizerestorebranch) endpoint. This step performs the following actions:
- Moves your original branch's computes to the new branch and restarts the computes.
- Renames the new branch to original branch's name.
- Renames the original branch to ` (old)`. Other snapshots you may have taken remain attached to this branch.
```bash
curl -X POST "https://console.neon.tech/api/v2/projects/project_id/branches/branch_id/finalize_restore" \
-H "Content-Type: application/json" \
-H 'authorization: Bearer $NEON_API_KEY' |jq
```
Parameters:
- `project_id`: The Neon project ID.
- `branch_id`: The branch ID of the branch created by the snapshot restore operation.
## Limitations
- Instant restore (PITR) is currently not supported on branches created from a snapshot restore. If you restore a snapshot to create a new branch, you cannot perform point-in-time restore on that branch at this time. Attempting to do so will return an error: `restore from snapshot on target branch is still ongoing`.
- **Reset from parent is unavailable on child branches for up to 24 hours after restoring a parent from a snapshot.** When you restore a branch from a snapshot, any child branches of that restored branch cannot use the [Reset from parent](/docs/guides/reset-from-parent) feature for up to 24 hours.